

Advanced Threat Protection (ATP) offers protection against advanced malware, zero-day exploits, and targeted attacks not detected by the intrusion prevention system by scanning downloaded files. The user receives the downloaded file immediately after the hash DB lookup, which compares a hash of the file with the Barracuda database to see if it is a malicious file. Simultaneously, the file is uploaded to the Barracuda ATP cloud, but only if the file is 10 megabytes or less. Archives are unpacked and the files they contain are sent to the ATP cloud with the same restriction that only unpacked files 10 megabytes or less are sent to the ATP cloud for inspection. In the ATP cloud, those files are emulated in a virtual sandbox and their behaviour is analyzed. Depending on the behaviour of the file, it is assigned a threat level that is transmitted to the appliance. If the threat level exceeds the ATP threat level threshold, the file is blocked; otherwise, it is delivered.
Advanced Threat Protection can be used for HTTP, HTTPS, FTP, and FTPS traffic. For HTTPS and FTPS, SSL Inspection must be activated.
The following file types are scanned by the Barracuda ATP cloud:
- Microsoft Office files – doc, docx, ppt, pps, pptx, ppsx, xls, xlsx
- OpenOffice – rtf, open office document extensions
- Microsoft executables – exe, msi, class, wsf
- macOS executables
- PDF documents – pdf
- Android APK files – apk
- ZIP Archives – 7z, lzh, bz, bz2, chm, cab, zip
- RAR Archives – rar4 and rar5
- TAR Archives – tar
- GZ Content – Content compressed with gzip
Risk Scores
The ATP service classifies all files in one of four categories:
- High – Files classified as high risk exhibit behavior normally only found in malware.
- Medium – Files classified as medium risk pose a potential risk.
- Low – Files classified as low risk are considered to be harmless. Some residual risk remains.
- None – No suspicious activity was detected.
Reporting
You can create reports and notifications using Azure Log Analytics Workspace. Your SecureEdge service must be connected to Azure Log Analytics Workspace. For more information, see How to Configure Log Streaming to Microsoft Azure Log Analytics Workspace.
Maximum Number of Scans
| Scale Units Gateway | Maximum Scans per Minute | Maximum Scans per Month |
|---|---|---|
| 2 | 100 | 2 000 000 |
| 4 | 100 | 2 000 000 |
| 10 | 100 | 2 000 000 |
| 14 | 100 | 2 000 000 |
| 20 | 100 | 2 000 000 |
| 30 | 150 | 3 000 000 |
| 40 | 150 | 3 000 000 |
| 60 | 200 | 4 000 000 |
| 80 | 250 | 5 000 000 |
Before You Begin
- If you want to select users or groups in the policies, you must first connect your Microsoft Entra ID . For more information, see How to Connect Your Microsoft Entra ID with Barracuda Cloud Control.
- Enable SSL Inspection.
Create Advanced Threat Protection Rules
- Go to https://se.barracudanetworks.com and log in with your existing Barracuda Cloud Control account.
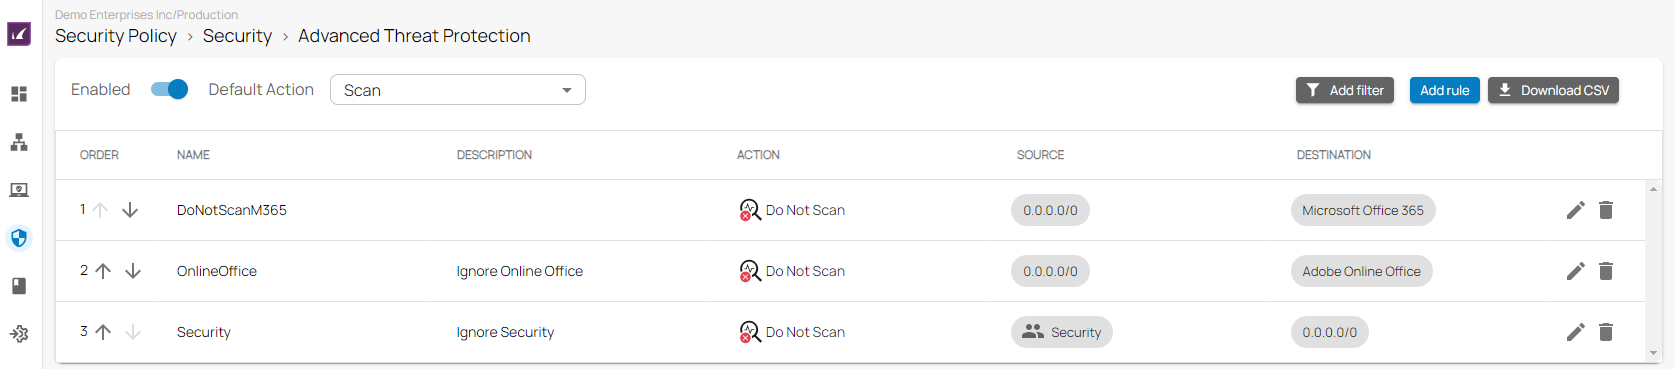
- Go to Security Policy.
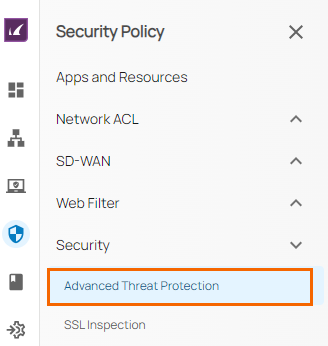
- Expand the Security menu on the left and select Advanced Threat Protection.
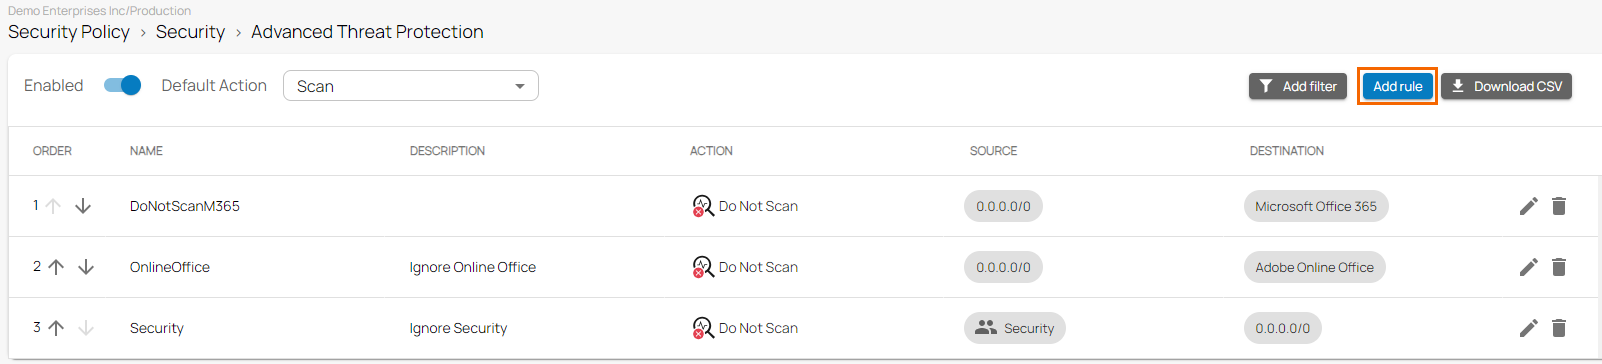
- The Advanced Threat Protection window opens. To create a new rule, click Add Rule.
- The Add New Rule window opens. Specify values for the following:
- Name – Enter a name for the rule.
- Description – Enter a brief description for the rule.
- Action – Select an action. You can choose either Scan or Do not Scan.
- In the SOURCE CRITERIA section, specify values for the following:
- Type – Select a source type. You can choose between IP/Network, Site, and User/Group. If you want to select users or groups in the policies, you must first connect your Microsoft Entra ID . For more information, see How to Connect Your Microsoft Entra ID with Barracuda Cloud Control.
- IP/Network – Enter an IP or network address.
- In the DESTINATION CRITERIA section, specify values for the following:
- Type – Select a destination type. You can choose between Application, Domain, IP/Network, and Site.
- Application – Select an application. For more information, see How to Create Custom Applications.
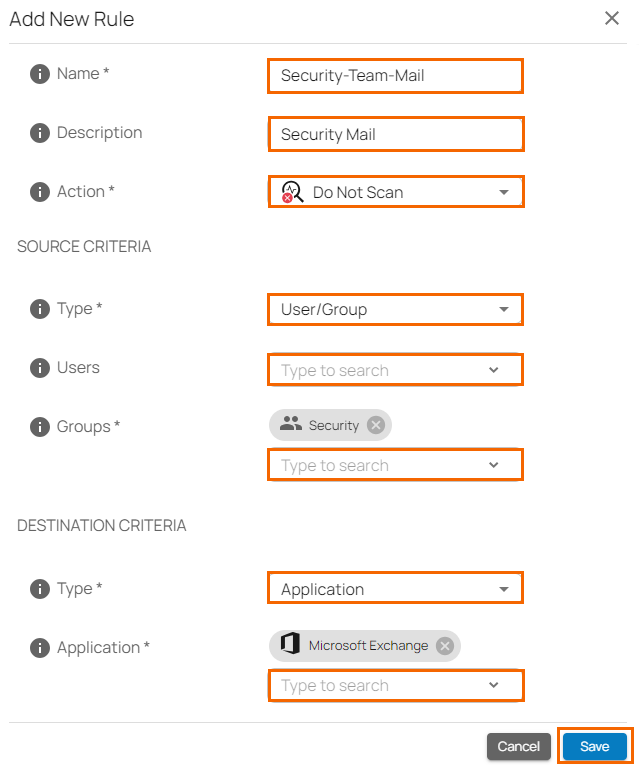
- Click Save.
Edit an Existing Rule
- In the left menu, click Security Policy.
- Expand the Security menu on the left and select Advanced Threat Protection.
- The Advanced Threat Protection window opens. Click on the pencil icon next to the rule you want to edit.

- The Edit Rule window opens. Edit the value you are interested in.
Click Save.
Remove an Existing Rule
- In the left menu, click Security Policy.
- Expand the Security menu on the left and select Advanced Threat Protection.
- The Advanced Threat Protection window opens. Click on the trash can icon next to the rule you want to remove.

- The Delete Rule window opens.
Click OK to confirm.
Select the Default Action
You can configure Advanced Threat Protection to either scan or not scan by default.
- Go to https://se.barracudanetworks.com and log in with your existing Barracuda Cloud Control account.
- Go to Security Policy.
- Expand the Security menu on the left and select Advanced Threat Protection.
- The Advanced Threat Protection page opens. Select the Default Action. You can choose either Scan or Do not Scan.

Further Information
- For more information on User and Groups, see How to Connect Your Microsoft Entra ID with Barracuda Cloud Control.