

SSL Inspection decrypts both SSL and TLS connections so the appliance can allow features, such as Advanced Threat Protection and IPS, to scan traffic that would otherwise not be visible to the service.
Before You Begin
- If you want to select users or groups in the policies, you must first connect your Microsoft Entra ID. For more information, see How to Connect Your Microsoft Entra ID with Barracuda Cloud Control.
- SSL Inspection does not support the QUIC protocol used by Google Chrome and therefore will not inspect traffic using QUIC. If you want to use SSL Inspection for all traffic, you must block the QUIC protocol on the respective CloudGen Firewall. For instructions, see Step 3. in How to Configure Google Accounts Filtering in the Firewall in the CloudGen Firewall documentation.
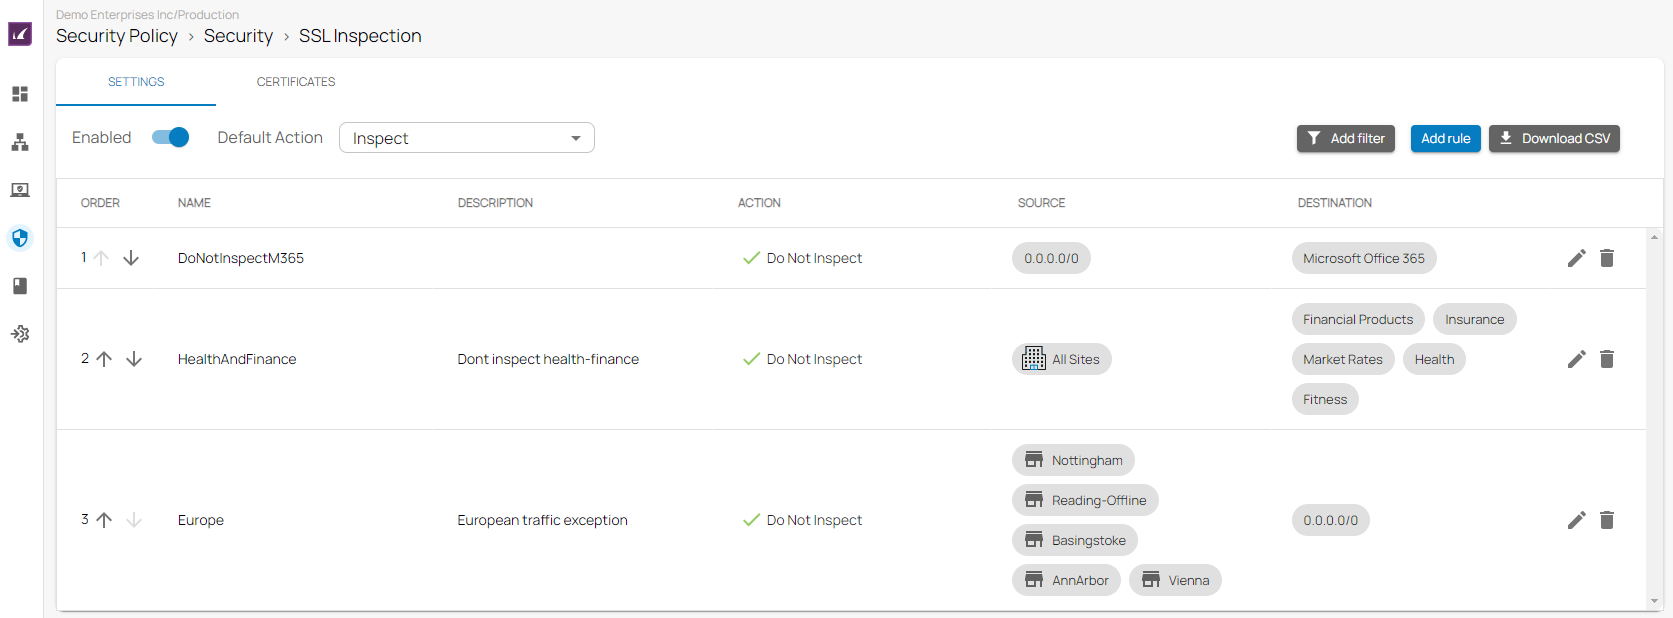
Settings
In this section, you can add explicit rules, such as exemptions for traffic that should not be scanned. For example: financial traffic. In addition, you can specify the default action for SSL Inspection.
Add a Rule
- Go to https://se.barracudanetworks.com and log in with your existing Barracuda Cloud Control account.
- Go to Security Policy.
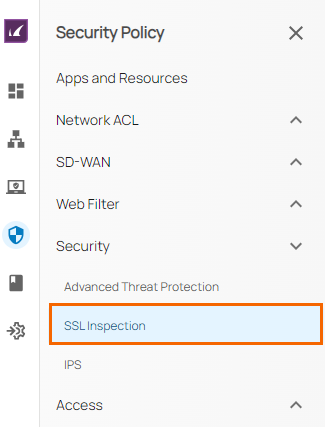
- Expand the Security menu on the left and select SSL Inspection.
- The SSL Inspection window opens. To create a new rule, click Add Rule.

- The Add New Rule window opens. Specify values for the following:
- Name – Enter a unique name for a rule.
- Description – Enter a brief description.
- Action – Select an action type. You can choose either Inspect or Do Not Inspect.
- In the SOURCE CRITERIA section, specify values for following:
- Type – Select a source type. You can choose between IP/Network, Site, and User/Group. If you want to select users or groups in the policies, you must first connect your Microsoft Entra ID. For more information, see How to Connect Your Microsoft Entra ID with Barracuda Cloud Control.
- IP/Network – Enter an IP or network address, and click +.
- In the DESTINATION CRITERIA section, specify values for the following:
- Type – Select a destination type. You can choose between Application, URL Category, Custom Categories, Domain, IP/Network, and Site.
- Application – Select an application. For more information, see How to Create Custom Applications.
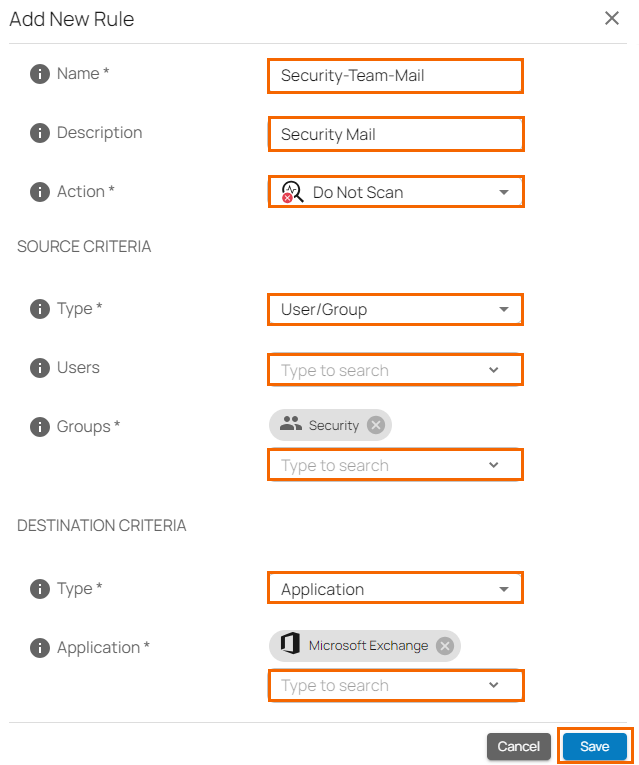
- Click Save.
Edit an Existing Rule
- In the left menu, click Security Policy.
- Expand the Security menu on the left and select SSL Inspection.
- The SSL Inspection window opens. Click on the pencil icon next to the rule you want to edit.

- The Edit Rule window opens. Edit the value you are interested in.
Click Save.
Remove an Existing Rule
- In the left menu, click Security Policy.
- Expand the Security menu on the left and select SSL Inspection.
- The SSL Inspection window opens. Click on the trash can icon next to the rule you want to remove.

- The Delete Rule window opens.
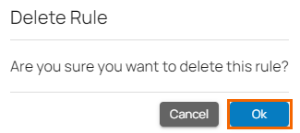
Click OK to confirm.
Select the Default Action
You can configure SSL inspection whether or not to inspect traffic by default.
- Go to https://se.barracudanetworks.com and log in with your existing Barracuda Cloud Control account.
- Go to Security Policy.
- Expand the Security menu on the left and select SSL Inspection.
- In the SETTINGS section, select the Default Action.

Certificates
In this section, you can add, edit, and delete SSL Inspection certificates and trusted certificate authorities.
Add SSL Inspection Certificate
- Go to https://se.barracudanetworks.com and log in with your existing Barracuda Cloud Control account.
- Go to Security Policy.
- Expand the Security menu on the left and select SSL Inspection. The SSL Inspection window opens.
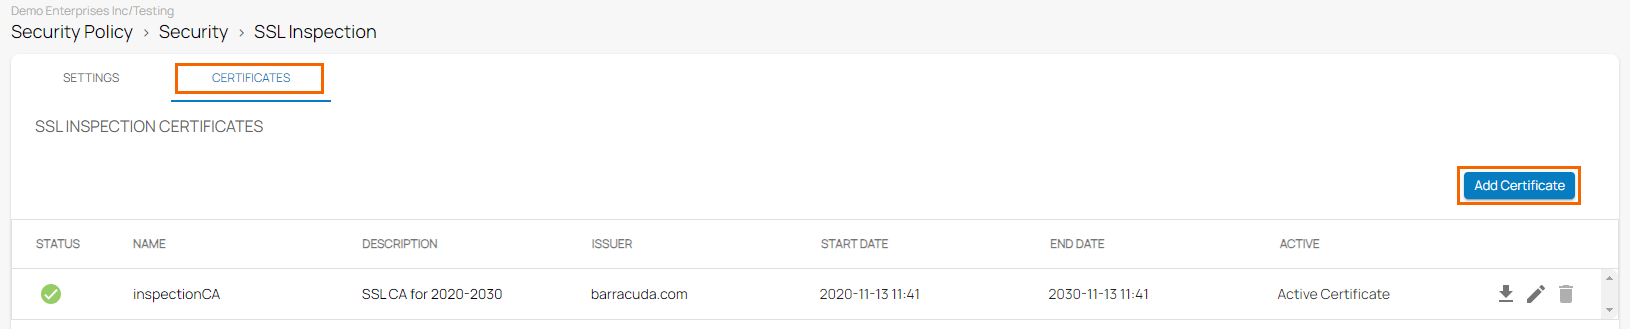
- Click the CERTIFICATES tab. The certificates configuration window opens.
- In the SSL INSPECTION CERTIFICATES section, click Add Certificate.
- The Upload New Certificate window opens. Specify values for the following:
- Name – Enter a unique name for your certificate.
- Description – Enter a brief description.
- Upload PKCS12 – Click Upload File to upload the certificate file. Note that it must contain a private key.
- Passphrase – Enter the passphrase of the certificate.
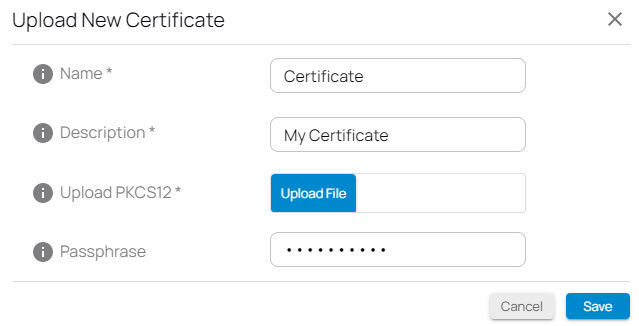
- Click Save.
Add Trusted Certificate Authorities
- Go to https://se.barracudanetworks.com and log in with your existing Barracuda Cloud Control account.
- Go to Security Policy.
- Expand the Security menu on the left and select SSL Inspection.
- The SSL Inspection window opens. Click the CERTIFICATES tab.The certificates configuration window opens.
- In the TRUSTED CERTIFICATE AUTHORITIES section, click Add Certificate.

- The Upload New Certificate window opens. Specify values for the following:
- Name – Enter a unique name for your certificate.
- Description – Enter a brief description.
- Upload PEM or CRT – Click Upload File to upload the certificate file.
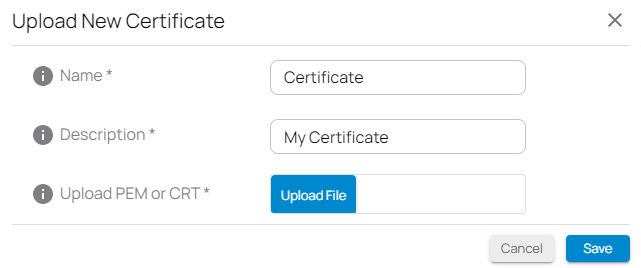
- Click Save.
Edit, Download, or Delete an Existing Certificate
Note that only certificates added in the SSL Inspection section can be downloaded.
- Download – Click on the download icon next to the certificate you want to download a client certificate for.
- Edit – Click on the pencil icon next to the certificate you want to edit.
- Delete – Click on the trash can icon next to the certificate you want to delete. Note that in the SSL Inspection Certificate section, you cannot delete an active certificate.
Further Information
- For more information on Malware Protection, see Advanced Threat Protection.
- For more information on Intrusion Prevention, see IPS.