

Migration Options
You can select from four migration options:
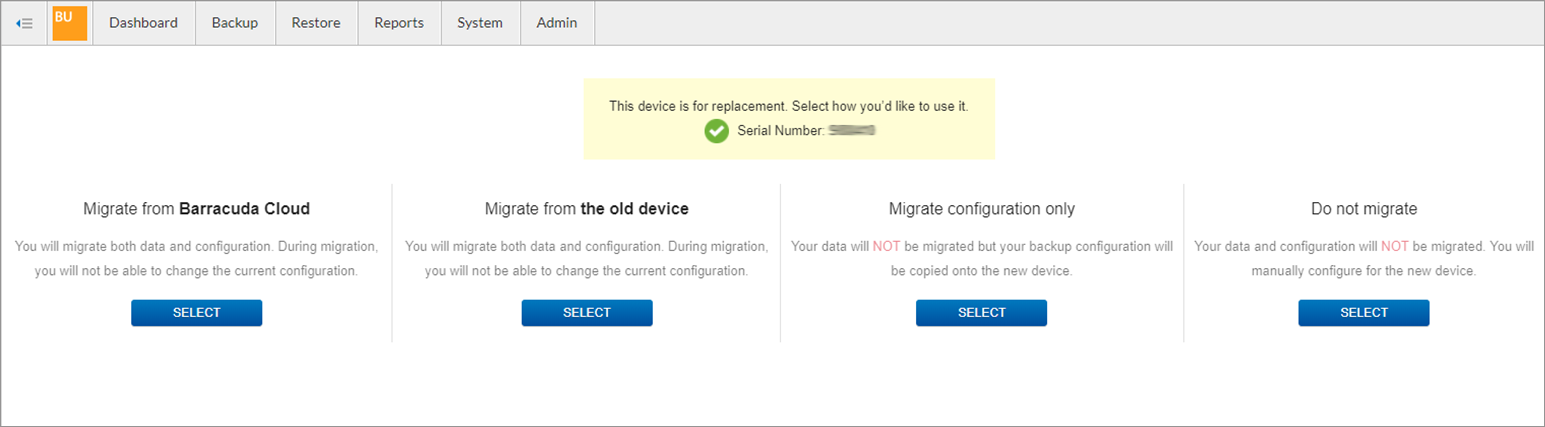
- Option 1: Migrate from Barracuda Cloud – Data and backup configuration are migrated from Barracuda Cloud
- Option 2: Migrate from Old Device – Data and backup configuration are migrated from your old device
- Option 3: Migrate Configuration Only – Your backup configuration is migrated but data is not migrated
- Option 4: Do not Migrate – Your data and backup configuration are not migrated
Pre-Migration Steps for Options 1 and 2
Before you can replace a device and migrate the data, you must first install and configure the new Barracuda Backup device with an IP address, ensuring that it is online. Use the Barracuda Quick Start Guide included with your appliance (also available as a PDF download from the Overview page).
You can take these additional steps to ensure a smooth migration and reduce the initial setup time:
- Have the replacement device installed and online with a valid IP address
- Verify a support tunnel is open on the old/existing device, preferably before linking the new device (see the Technical Support article for details on opening a support tunnel):

- If possible, have both the old/existing device and the replacement/new device on the same networking switch and subnet for the best data transfer/migration performance
- Have the replacement device linked to your Barracuda Cloud Control account (see Activate a Barracuda Backup Device as a Reseller)
- Ensure that any firewall or web filtering rules configured for the old/existing device are configured for the replacement device (see Barracuda Console)
Replacement and Data Migration Process for Options 1 and 2
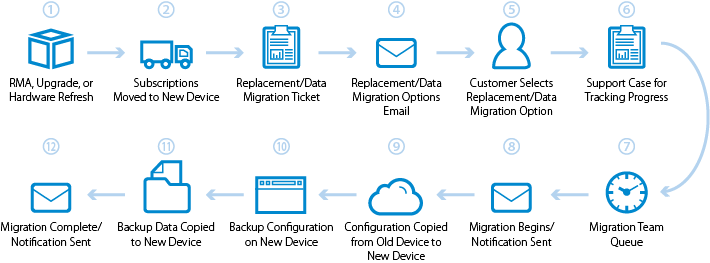
The replacement and data migration process consists of the following steps:
- An RMA, upgrade, or hardware refresh is processed (see the section Replacing a Failed Barracuda Backup Appliance ).
- The subscriptions (Energize Updates, Instant Replacement, Cloud) on the old/existing device are moved to the new/replacement device (see Administration).
- A replacement/data migration ticket is created and sent to the Barracuda migrations team.
- An email is sent to the customer with a list of available options for the replacement/data migration process, as described in the Data Migration Options section below.
- The customer replies to the email in Step 4 with their selected data migration option.
- A technical support case/ticket is created to track the replacement/data migration progress.
- The case/ticket is sent to the migrations team queue.
- The ticket is picked up based on priority by a Barracuda migrations team member and an email is sent to the customer notifying them that the replacement/data migration has begun.
- The configuration (metadata) is pulled from the old/existing device or cloud (based on the option selected by the customer) and copied to the new/replacement device.
- After the metadata pull is complete, backups are functional and run as normal. The entire backup configuration is now present on the new/replacement device and can be accessed and/or modified as normal.
- The backed up data (binary data) is pulled from the old/existing device or cloud (based on the option selected by the customer) and copied to the new/replacement device.
- Once the binary pull is complete, an email is sent to the customer notifying them that the replacement/data migration is complete.
Data Migration Options
Select the data migration option that best suits your deployment.
Option 1. Migrate from Barracuda Cloud
If you elect to pull the data from the cloud, Barracuda Networks uses the following procedure to complete your request:
- Once the new unit is linked, Barracuda Networks connects to the new device and begins wiping the metadata in the database ensuring the unit is completely clean of any data. When data migration is initiated, the Dashboard displays the following warning:

Barracuda Networks then pulls the metadata associated with all binary data (your backed-up data).
- As the metadata is downloaded, it is inserted into the database tables on the new device. Depending on the amount of metadata to be pulled, this process may take 24 or more hours to complete.
- Once the metadata download is complete, backups are enabled on the new device, and the binary data is then pulled from the cloud. The process of pulling the binary data from the cloud can take 24 hours or more depending on the amount of data to be retrieved.
You will receive a notification at the time backups start and the binary data begins to be pulled.
- Once the initial binary data pull is complete, a final check is run with the cloud to ensure data integrity and to verify that all data is present and accounted for. Once verification is complete, the data migration as a whole is finished.
You will receive a notification indicating the process is complete.
Option 2. Migrate Data from an Existing Barracuda Backup Appliance
If you have elected to pull the data from your existing Barracuda Backup appliance, confirm the following:
- Both appliances are on the same LAN/subnet, and
- Both appliances are linked to a Barracuda Networks Account
- Once the new device is linked to the existing Barracuda Backup appliance, Barracuda Networks begins prepping the old device for the migration including:
- Shutting down all dependent functions of the old device
- Dumping the metadata tables from the databases on the old device in order to pull them across and import them into the new appliance
- Once prepping is complete, Barracuda Networks begins the actual data migration by importing the metadata tables from the old device to the new appliance. When data migration is initiated, the Dashboard displays the following warning:
Once the metadata import is complete, backups are enabled on the new appliance and backups can run on all data sources. The binary data is migrated across to the new appliance in the background. The process of pulling the binary data from the old device can take 24 hours or more depending on the amount of data being migrated.
You will receive a notification alerting you that the backup process has begun on the new device and that data is syncing.
- Once the initial binary data pull is complete, a final check is run with the cloud to ensure data integrity and to verify that all data is present and accounted for. Once verification is complete, the data migration as a whole is finished.
- You will receive a notification indicating the process is complete.
Option 3. Migrate Configuration Only
You can set up and configure a new Barracuda Backup appliance with an existing configuration, data sources, retention policies, and all other aspects of backup.barracuda.com. This is the fastest type of migration because you are not migrating large amounts of data.

To use an existing configuration:
Option 4. Do not Migrate
You can set up and configure a new Barracuda Backup appliance from scratch without utilizing an existing configuration. With this option, you must configure the new device from scratch as it is treated as a brand new unit.

Barracuda Backup Replacement and Data Migration FAQ
The following table lists Barracuda Backup replacement and data migration frequently asked questions.
| Question | Answer |
|---|---|
| What do I do if I need my migration to start immediately? | If you are in a disaster or data recovery scenario and require the data migration process to be prioritized and begin immediately, notify the Barracuda migrations team member when you reply to the data migrations email. You can also contact the migrations team at BBSMigrations_team@barracuda.com. |
| How long should I expect the data migration to take? | The metadata transfer is the most important part of the data migration process. Once the metadata pull is complete, backups run on schedule and the backup device has full functionality. The metadata pull can take up to 48 hours, but in most cases can be accomplished in just a few hours. The time it takes for the metadata pull to complete is dependent upon the size of the dataset, the Barracuda Backup model, and customer bandwidth and/or network performance. The binary data transfer usually takes a bit longer than the metadata transfer and is done in the background while the replacement device is running normally. Binary data transfers can range from several hours to days or even weeks, depending on the size of the dataset, the Barracuda Backup model, and customer bandwidth and/or network performance. Another factor affecting the binary data transfer is the available processing resources on the Barracuda Backup device. Devices that are performing backups around the clock, heavy offsite replication, and data purging will negatively impact the binary data transfer. |
| When will my backups run? | Backup jobs are kicked off as soon as the metadata pull is complete. After that, all scheduled backup jobs run per the configured schedule time. |
| Will Barracuda contact me with an update once the binary data transfer has begun? | No. If you would like an update on the progress of the binary data transfer, contact the migrations team at BBSMigrations_team@barracuda.com. Make sure to include your device serial number and/or the case number in the email. |
| Will my data be secure during the migration process? | Yes. Data being transferred from the old/existing device to the new/replacement device is on the customer LAN and presumably behind the customer firewall. Data pulled down from the cloud to the new/replacement device is transferred in its encrypted state until it reaches the new/replacement device where it is then unencrypted. |
| Can I restore data during the migration? | Yes. The metadata pull can take up to 48 hours, but in most cases can be accomplished in just a few hours. Once the initial step of the metadata pull is complete, a restore job can be initiated. |
| Can I select the servers or backup sets that are migrated? | No. The replacement/data migration process is all or nothing. |
Site-to-Site and Site-to-Vx Migration Process
This section describes the site-to-site and site-to-Vx process.
Set Up the New Appliance
Before you can replace a device and migrate the data, you must first install and link the new Barracuda Backup appliance. Refer to the Barracuda Backup Quick Start Guide included with your appliance (also available as a PDF download from the Overview page). Once the device is linked, contact Barracuda Networks Technical Support or your sales engineer to start the migration.
Understand the Migration Process
There are two steps to migrate data from an existing Barracuda Backup appliance to a new unit as detailed above in Option 2 of the Data Migration Options section:
- First, the Barracuda Networks migration engineer must copy the metadata and configuration from the original appliance to the new appliance, which typically takes less than 24 hours. Once this is complete, the new device functionally takes the place of the original device, including backup jobs.
- Second, the Barracuda Networks migration engineer must copy the actual data from the original appliance to the new appliance. This takes place in the background and does not impact backup jobs. This process can take multiple days depending on the amount of data being transferred as well as network speeds.
You can view migration progress on the System > Advanced Graphs page in the web interface.
Determine Migration Progress
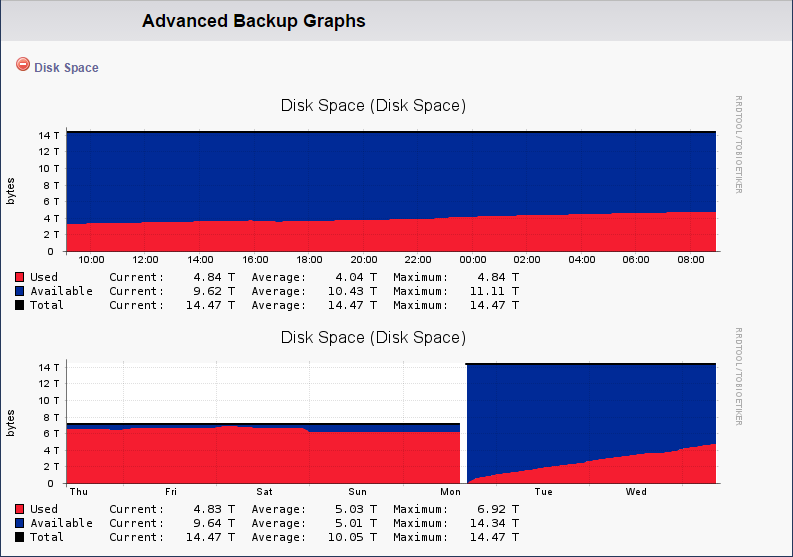
Use the Disk Space graph to determine the amount of data awaiting migration. Log in to the new appliance web interface, go to the System > Advanced Graphs page, and e xpand the Disk Space graph. Typically the remaining amount of data to be migrated can be determined using the first two graphs.
For example, in Figure 1 there was roughly 6 TB of data on the original unit before the migration began on Monday afternoon, and at this point the migration has transferred approximately 4.8 TB of data. Because backups have been running since the metadata and configuration were copied to the new appliance, and data has been purged according to retention policies, the migration may finish with slightly more or less data, but this graph provides a good estimate of the current migration progress.
Figure 1. Disk Space.
Use the Local Ethernet Traffic graph to determine the speed at which data is being transferred to the new appliance. Log in to the new appliance web interface, go to the System > Advanced Graphs page, and expand the Local Ethernet Traffic graph. This provides a good indication of the speed at which data is being transferred.
For example, in Figure 2, the Inbound traffic in green shows that the migration is running at around 20MB per second or 160Mb per second. The Inbound traffic spikes represent backup jobs that are running at night, in this case starting around 10:30pm, but the constant 20MB per second bandwidth usage is the box-to-box data transfer. At 20MB per second one can expect around 1.5 TB of data transfer per day. This is in line with the increase shown in Figure 1, Disk Space.
Figure 2. Local Ethernet Traffic.

Once data transfer is complete, the Barracuda Networks migration engineer performs the final steps to complete the process. Once verification is complete, you will receive a notification indicating the process is complete. At this point the Inbound Local Ethernet Traffic drops back to around 0 when backups are not running. If you have questions about your migration, contact Barracuda Networks Technical Support .
Replacing a Failed Barracuda Backup Appliance
Instant Replacement Service
In the event that a Barracuda Backup appliance fails and you cannot resolve the issue, customers that have purchased the Instant Replacement service can contact Barracuda Networks Technical Support to arrange for a new unit to be shipped out within 24 hours.
After receiving the new system, ship the old Barracuda Backup appliance back to Barracuda Networks with the Return Material Authorization (RMA) number clearly marked on the package; Barracuda Customer Services can provide details on the best way to return the unit.