To scan SMTP and POP3 traffic from clients behind the firewall to SMTP and POP3 servers in the Internet, configure an access rule to match your web traffic and enable Application Control, TLS Inspection (optional, but mandatory for SMTPS and POP3S), and the Virus Scanner. If malware is detected, the file is discarded and the connection is reset. If ATP is enabled, files passed by the Virus Scanner are then uploaded to be analyzed in the Barracuda ATP Cloud.
Before You Begin
- Enable Application Control. For more information, see How to Enable Application Control.
- Create a Virus Scanner service. For more information, see Virus Scanner.
- (optional) Configure File Content Filtering in the Firewall. For more information, see File Content Filtering in the Firewall.
- (optional) Configure ATP in the Firewall. For more information, see How to Configure ATP in the Firewall.
- Configure TLS Inspection for FTPS traffic. For more information, see How to Configure Outbound TLS Inspection
Step 1. Configure the Virus Scanner Engine(s)
Select and configure a virus scanner engine. You can use Avira and ClamAV either separately or together. The CloudGen Firewall F100 and F101 can only use Avira.
- Go to CONFIGURATION > Configuration Tree > Box > Assigned Services > Virus-Scanner > Virus Scanner Settings .
- Click Lock.
- Enable the virus scanner engines of your choice:
- Enable the Avira AV engine by selecting Yes from the Enable Avira Engine list.
- Enable the ClamAV engine by selecting Yes from the Enable ClamAV list.
- Click Send Changes and Activate.
Step 2. Enable Virus Scanning for SMTP and POP3
Enable support for virus scanning SMTP and POP3 connections in the Firewall service.
- Go to CONFIGURATION > Configuration Tree > Box > Assigned Services > Firewall > Security Policy.
Click Lock.
In the Virus Scanner Configuration section, select the SMTP and POP3 check box.

(optional) Change the Action if Virus Scanner is unavailable.

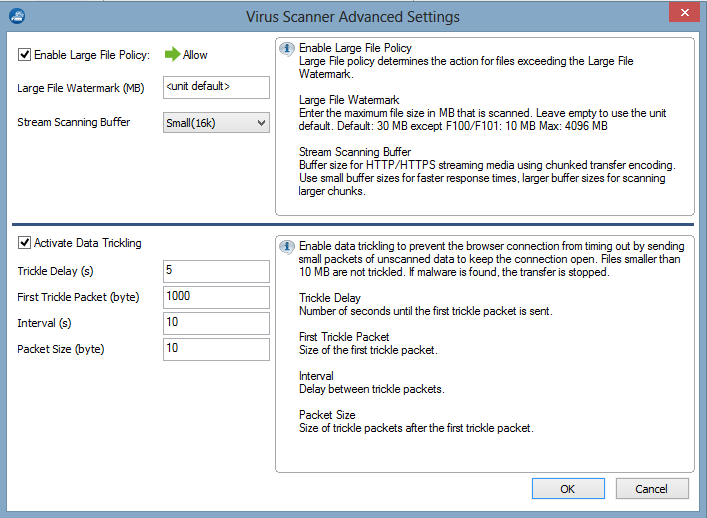
(optional) Click Advanced:

- Large File Policy – Action taken if the file exceeds the size set as the Large File Watermark. Select Allow to forward the files unscanned; select Block to discard files that are too big to be scanned.
- Large File Watermark (MB) – The large file watermark is set to a sensible value for your appliance. The maximum value is 4096 MB.
- Stream Scanning Buffer – Select the buffer size for HTTP/HTTPS streaming media using chunked transfer encoding. Select Small for faster response times, Big to scan larger chunks before forwarding the stream to the client.
- Data Trickling Settings – Change how fast and how much data is transmitted. Change these settings if your browser times out while waiting for the file to be scanned.

- Click Send Changes and Activate.
Step 4. Create Access Rule for SMTP and POP3 Client Downloads
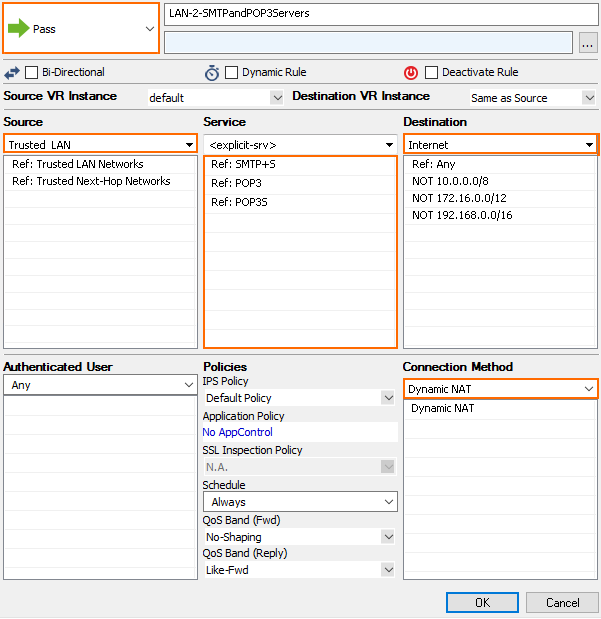
To scan connections to external SMTP, SMTPS, POP3, and POP3S servers, configure a Pass access rule and enable Application Control, TLS Inspection, Virus Scanning, and (optional) ATP.
- Go to CONFIGURATION > Configuration Tree > Box > Assigned Services > Firewall > Forwarding Rules.
- Click Lock.
- Either click the plus icon (+) at the top right of the ruleset, or right-click the ruleset and select New > Rule.

- Select Pass as the action.
- Enter a Name for the rule.
- Specify the following settings to match your outbound SMTP and POP3 connections:
- Action – Select Pass.
- Source – Select Trusted Networks.
- Destination – Select Internet.
- Service – Select SMTP+ S, POP3, and POP3S.
- Connection Method – Select Dynamic NAT.

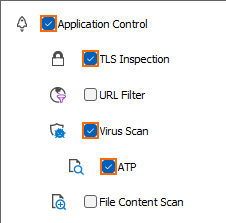
- Click on the Application Policy link and select:
- Application Control – required.
- TLS Inspection – required.
- Virus Scan – required.
- ATP – optional.

- Select a policy for outbound TLS Inspection from the TLS Inspection Policy drop-down list. For more information, see How to Configure a TLS Inspection Policy for Outbound TLS Inspection.
- Click Send Changes and Activate.
Next Steps
- To combine ATP with virus scanning, see Advanced Threat Protection (ATP) and How to Configure ATP in the Firewall.
- To combine virus scanning with file content filtering, see File Content Filtering in the Firewall.
