

Add keyword classifiers to search for within a given file. These keyword classifiers are given a gray classification label on the Detections page.
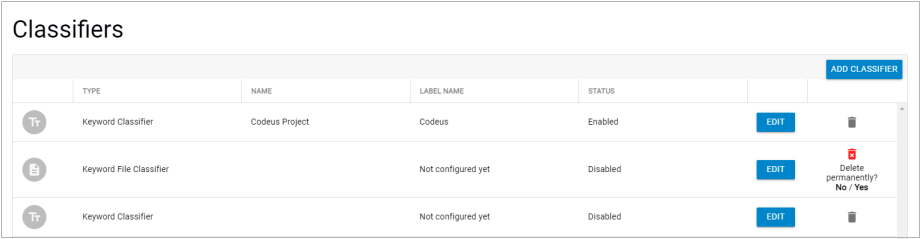
Add Classifiers
Click Add Classifier. Select the creation method and continue with the steps below.
- Keyword Classifier – Specify the custom keywords that will be used to find matches.
- Keyword File Classifier – Upload a file with a list of keywords. Each keyword must be on a separate line.
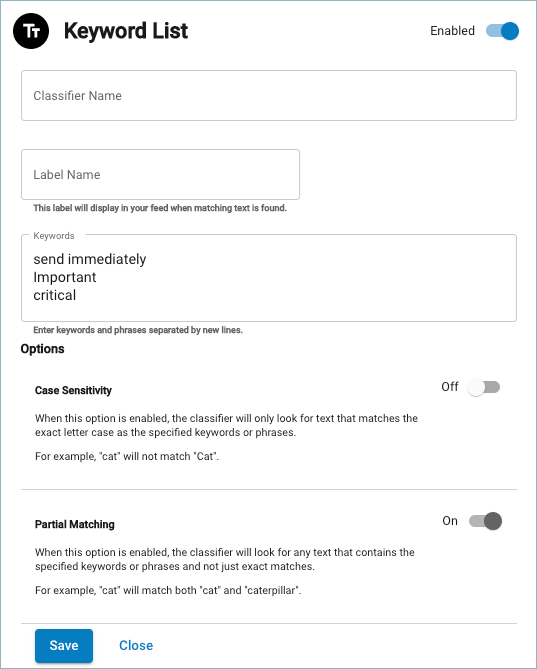
Adding a Keyword Classifier
Specify one or more keywords.
- Toggle to Enable the keyword classifier at the top right corner. You can also leave it at Disabled until needed in the future.
- Enter a Classifier Name.
- Enter a Label Name. When a match is found, this label will display under Classifiers in the Detections log and as a Violation in the detection details.
- Multiple keywords can be added to the Keywords field. Each can be one or more words. Add one per line. No commas or other punctuation should be used to separate keywords.
- Toggle the Case Sensitivity to On or Off. When enabled, the classifier will only look for an exact case match. Example: Received The Invoice does not match Received the Invoice.
- Toggle Partial Matching to On or Off. If enabled, the classifier will look beyond exact matches. Example: send will match resend and sending, but not sent.
- Click Save.
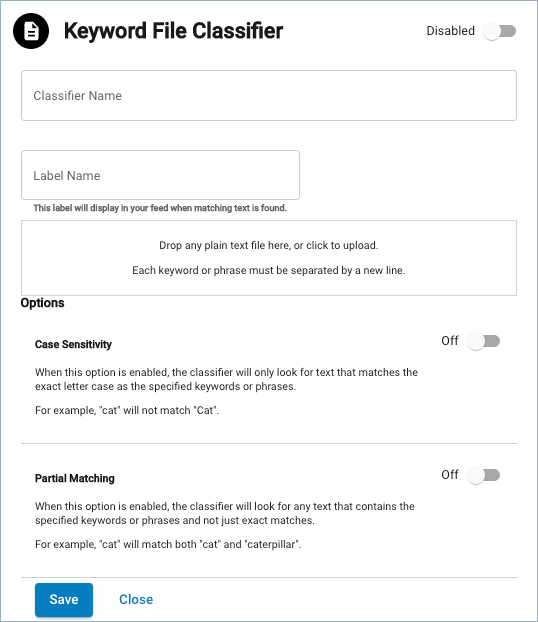
Adding a Keyword File Classifier
Upload a file with a list of keyword classifiers, each on a separate line.
- Toggle to Enable the keyword file classifier at the top right corner. You can also leave it at Disabled until needed in the future.
- Enter a Classifier Name.
- Enter a Label Name. When a match is found, this label will display under Classifiers in the Detections log and as a Violation in the detection details.
- Either drag a plain text file into the box provided or click there to upload a plain text file. Each keyword in the file can be one or more words, but only should only contain one keyword per line. No commas or other punctuation should be used to separate keywords.
- Toggle the Case Sensitivity to On or Off. When enabled, the classifier will only look for an exact case match. Example: Received The Invoice does not match Received the Invoice.
- Toggle the Partial Matching to On or Off. If enabled, the classifier will look beyond exact matches. Example: send will match resend and sending, but not sent.
- Click Save.
Adding a Regex Classifier
Add a regular expression you design to match various words, phrases, or character groups.
- Toggle to Enable the regular expression classifier at the top right corner. You can also leave it at Disabled until needed in the future.
- Enter a Classifier Name.
- Enter a Label Name. When a match is found, this label will display under Classifiers in the Detections log and as a Violation in the detection details.
- Enter a regular expression that is compatible with the Google RE2 library.
- To be sure that the classifier will work as expected, enter text into the Text String field that you expect to match your regular expression.
- Click the Test Match button. The portion of the string matching the regular expression will highlight in yellow and the number of matches will be stated below.
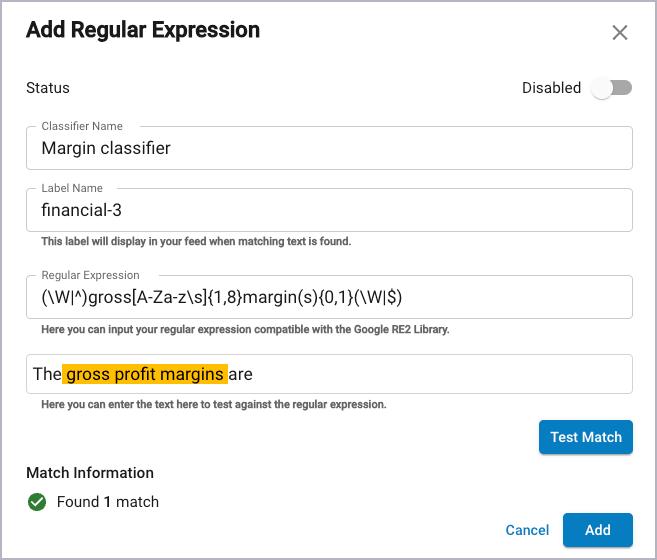
- Once you have tested the regular expression and are satisfied with its operation, click Add.
Edit a Classifier
Click Edit next to the keyword classifier you want to change. See Add Classifiers above for details about the various options. When you are done editing the details, click Save.
Remove a Classifier
Click the trashcan icon next to the keyword classifier you want to remove. Select Yes to delete the classifier.
Return to Settings.